Tag Archives: tips

8 TIPS TO STAYING COOL & CALM IN THE COMPETITION ARENA

Facebooktwitterredditpinterestlinkedinmail

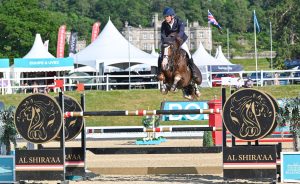
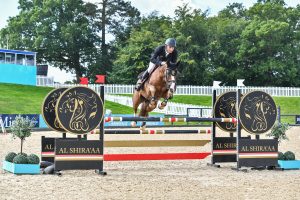
Horse Scout Blogger was speaking with a rider coming up to their first competition level hike. At home they have been performing well and are well prepared in terms of ability and focus and will do well if our rider focuses on what the horse needs from him……The BIGGEST secret to you performing at your best, when it counts the most, is learning how to keep yourself CALM and COMPOSED. If you allow yourself to get too nervous or too excited right before or during a competition, then your muscles will tighten up, you’ll lose your confidence and your riding will go right down the tubes!

This is what it means to CHOKE! The rider gets so nervous that he/she ends up performing tight and tentatively — a mere shadow of your normal self and this will affect your horses performance to as he picks up on your tension.

THE REAL CAUSE OF OUT OF CONTROL NERVOUSNESS

Runaway, pre-competition nervousness can come from a lot of different sources: how good the other contestants are; the level at which you are competing; how important a competition is; how big the crowd is (and possibly more important to you – who in it is watching you; whether you’ll ride well today and win; How will the going be; Will you remember your test/course/timings— the list goes on and on.

While there are many things about your competitions that can potentially make you nervous, the true cause of your performance-disrupting nervousness isn’t any of the things that I’ve just mentioned above. The real cause of your out-of-control nerves is you! That’s right! YOU make YOURSELF nervous!

What I’m saying here is very important — It’s not what’s happening around or outside of you that makes you nervous. It’s what’s happening INSIDE that is the real cause of stress!

So it is important to take on board: It’s not the size, skill level or reputation of the competition arena that makes you nervous. It’s what you say to yourself about them in the days, hours and minutes leading up to the competition that’s the real culprit in sending your heart rate and blood pressure through the roof! Nervousness is always caused by our inner response to the things that are going on outside of us. But here’s the good news about that: If YOU make yourself nervous, then YOU have the ability to change your inner response to calm yourself down under competitive pressure.

Most riders who get too nervous to ride well do so because of what they focus on and think about as the day approaches. They worry about how well they’ll ride, what people may think or say about them, etc. Focusing on any or all of these things will guarantee that your stress level will go through the attic and your performance will get stuck in the cellar! To stay calm under pressure, you must learn to go into competitions with a completely different headset and focus. I


What you need is a game plan;  a game plan is a series of little mental goals that you want to bring into the performance with you. If you follow this game plan, it will guarantee that you’ll stay calm and relaxed when you perform. Remember, being your best when it counts the most is all about being loose right before and during your competitions.


Leading up to your performance –

1. KEEP YOUR CONCENTRATION IN THE “NOW”

Train yourself to keep your focus in the NOW — especially during your performance! This means that leading up to the performance, you don’t want to think about and focus on the upcoming competition and its importance. If you want to stay loose and relaxed, you must learn to keep your concentration in the now. When you’re in the action, you want to focus on one present-moment play at a time.

2. RECOGNIsE WHEN YOUR FOCUS “TRAVELS” AND BRING YOURSELF BACK

Concentrating on what is happening now and reacting to that is key. Whilst you have to anticipate your next move you must live in the now in order function from a position of strength. If your focus moves to reflect on what has happened or you start imagining the future bring your focus back.

3. KEEP YOUR FOCUS ON YOU, YOUR JOB AND YOUR PLAY

Allowing your focus to drift to anyone or anything other than you and your horse will quickly make you feel nervous. Staying focused on you and your job will keep you calm and confident.

4. DON’T COMPARE YOURSELF WITH OTHERS! Comparison will always make you too nervous to play at your best.

5. HAVE FUN – Enjoy your job

Enjoying your performance and appreciating what is going well is the secret ingredient to staying calm and doing your best when the heat of competition is turned up high. When fun goes, so will all of your skills.

6. LEAVE YOUR GOALS AT HOME

One of the biggest tension-inducing mental mistakes that you can make as an competitor is to take your goals with you into the competition. Focusing on what you need to achieve will make you too nervous to perform well and, ironically, cause you never to reach them. Instead, leave your goals at home and keep your focus in the action, on “this” movement, this turn, this half halt.

7. KEEP YOUR MIND DISTRACTED BEFORE AND AFTER GAMES

Thinking gets most performers into trouble and makes them nervous. While you can’t really stop yourself from thinking, you can purposely distract yourself from it. So, in the days and minutes leading up to a big performance or tournament, keep busy. Do not allow yourself a lot of free time to think. If you are going through your test or riding the course in your mind. Think about HOW you re riding each movement or jump etc not how difficult its going to be.

8. KEEP YOUR FOCUS OF CONCENTRATION AWAY FROM THE “UNCONTROLLABLES”

There are a lot of things that happen in your sport that you do not have direct control over. Any time an competitor focuses on an “uncontrollable” (UC), they will get really nervous, lose their confidence and ride badly. So make a list of all of the things about this upcoming competition that you can’t directly control. For example, the officiating; the crowd; the future, such as the outcome, how well you’ll ride, winning or losing; how you are feeling that day; other people’s expectations; etc., and post the list in a highly visible. Keep in mind that these UCs are mental traps. They are lying in wait for you and every other competitor in that competition. Concentrate on the things over which you do have control.

Remember, if you really want to ride well, you have to stay loose and relaxed. To do this, focus on executing this GAME PLAN!

GoodLuck


Be an efficient and effective rider. 10 Top Tips – Core strength, mobility and suppleness will make you ride better

Facebooktwitterredditpinterestlinkedinmail

How effective are you in the saddle.  Have you ever tried to tune in to what is happening under your saddle? Are you aware of the exact response from the horse to any given movement by you?

Are you a bit fuzzy on how the whole thing actually works. You know the basics, you ride inside to outside, you sit centrally in the saddle with subtle changes in weight reflected in the movements of your upper and lower body.  Legs controlling behind, shoulders the front and your core the power house creating energy, swing, impulsion, and lastly your seat providing a stable point from which to perform all this with a set which is light, mobile, agile, and controlled.

All this without even thinking about your spot on timing and direct ion, cadence, pace, suppleness and balance from your horse.  So much to think about all at once. Sometimes it’s easier to forget that there is a horse under you and concentrate on recreating the correct body shape needed to make efficient and accurate aids.

You can go a long way to helping yourself become efficient and effective in the saddle if you are fit and agile.

The key to being a effective rider starts on the ground.  You need to be fit.  Riding and mucking out  (unless you are one of our professional riders and trainers) is not enough you need to get out and to aerobic sports like running and swimming, fitness classes or dancing.  Dancing is very good for a rider as it helps with a sense of erythema and makes you agile at the same time.  However key to all progressive riding is being strong and mobile in your core.  Here are a few simple exercises which can help you start to strengthen you central core/abs.  As always with any fitness advice if you experience pain then you must consult your doctor before progressing further.  Taking part in fitness classes may be a way to get you motivated.  There is nothing better than the thought of thinking people will notice you haven’t been doing your ‘homework” to get things moving along a pace!

However if you want some exercises you can do at home with a minimum of equipment her are five simple ones to start you off.

1. Reverse Crunch with Resistance Bands

Targets: transverse abdominals

Lie on your back with your knees bent, arms down by your sides, holding one end of a band in each hand, with the band wrapped around tops of shins. Raise your knees toward your chest until your hips leave the floor. Hold for 3 seconds; lower to start. Repeat for 2 sets of 10 reps.

2. Knee-Ups

Targets: rectus abdominus

Brace yourself between the backrests of two sturdy chairs, keeping elbows slightly bent, shoulders down, neck relaxed, head and chest lifted. Keeping your abs tight, exhale and then very slowly bring your knees to your chest without swinging back and forth. If your form falters, try raising one knee at a time. Build up to 3 sets of 15 reps.

3. Leg Swings

Targets: obliques

Lie on back with arms out to sides, legs and feet pointing up. Exhale and draw navel in toward spine as you lower legs to left side about 5 inches from floor. Return to start and repeat on right side. Keep switching sides for a total of 15 reps. Work up to 3 sets.

4. Ball Leg Lift

Targets: transverse abdominals

Lie facedown on a ball and roll forward until your hands are on floor and just the tops of your feet are flat on ball. Keeping your back and right leg straight, slowly lift leg a couple of inches toward the ceiling. Hold for 3 seconds, then lower. Do 10 reps, then switch legs. Add 2 repetitions each week as long as you can maintain perfect form.

5. Butterfly Crunch

Targets: rectus abdominus (“six-pack”)

Lie on your back with the soles of your feet together as close to your body as possible, with knees bent out to sides. Place hands behind your head, elbows in line with ears. Keeping your back flat on floor and stomach muscles contracted, exhale and curl your chest up a few inches off the floor toward your legs. Lower to start. Repeat 10 times.

6. Side to Side

Targets: obliques (sides)

Lie on your back, knees bent and feet flat on the floor, with your arms at your sides. Exhale and contract your abs as you slide your right hand toward your right foot. Your head and neck should remain aligned and your lower back pressed to the floor. Return to start, then switch sides. Repeat 15 times.

7. Front Plank

Targets: transverse abdominals

Start on your hands and knees. Keeping your back and ab muscles contracted, drop down to your forearms while extending legs out behind you so you are resting on the balls of your feet. Be sure to keep your back straight, hips up, and neck relaxed. Hold for 3 seconds, then return to start. Repeat 10 times.

8. Fingers to Toes

Targets: rectus abdominus

Lie on your back with your legs straight and extended toward the ceiling, with arms down by your sides. Exhale and contract your abs as you crunch up from your waist and extend your hands toward your toes. Keep your back flat on the floor. Work up to 2 sets of 15 reps.

9. Scissors

Targets: obliques

Lie on your back with your fingers resting behind your head. Keeping your abdominals tight, raise your left knee and touch it to your right elbow. Return to start, then raise your right knee and touch it to your left elbow. Alternate for 15 reps in a smooth, continuous motion, keeping abs engaged and hands relaxed so you don’t pull on your neck. Work up to 2 sets.

10. Obviously don’t do all of these at once!! Work through the list joining on new sets as you get stronger.  Do not perform moves badly.  Stop and rest of do fewer repetitions until you are ready to move on.

Is grooming a haze of hair for you? Four Pointers For De Fuzzing Your Horse

Facebooktwitterredditpinterestlinkedinmail

Spring may be sprung – but sometimes its quite hard to un stick your horses hair!

Alas, when it comes to helping a horse lose his winter coat there are no magical short cuts, and the only thing Horse Scout Blogger can offer – that is guaranteed to work is:

Daily grooming and an application of good old-fashioned elbow grease!

To make things a little less scary but no less hairy:

  1. Grooming after exercise when the horse is warm and the pores of the skin are more open is much easier and the coat will shed more quickly.
  2. Use a rubber curry comb, a dandy brush and/or a grooming mitt to remove dead hair then go over the coat with a body brush to help massage the skin and stimulate the oil glands.
  3. To help protect your clothing try wearing overalls and if you have an allergy it is advisable to wear a disposable paper mask (readily available in supermarkets and chemists).
  4. On a good note, there is nothing more satisfying or calorie busting than a vigorous grooming session that ends with the emergence of a sleek, smart horse. Welcome to spring!

After such a long, cold winter riders have been looking forward to the spring and summer so that we can get out and enjoy our horses more. However, with the onset of longer daylight hours and warmer weather comes the inevitable shedding of winter coats and many of us disappearing in a haze of loose hair and dandruff every time we groom! It’s funny how the horse ends up looking smart but we end up coughing and spluttering and covered in hair.

Like many animals, horses grow a thick winter coat to help protect them against cold weather. The long, fluffy winter coat stands up and traps pockets of air to create an insulating layer and retain the heat. It is common for a horse, particularly bays to appear to change coat colour in the spring and summer. Some bay horses have an undercoat that is almost black and others appear to have a lighter summer coat.

Several elements trigger hair growth and shedding and these include environmental, nutritional and hormonal factors. The longer, warmer days of spring help to stimulate the loss of the winter coat.

Failure to lose the winter coat can be related to several different factors including a hormone imbalance. Older horses can often develop a condition known as Cushing’s disease, or Cushing’s syndrome, which affects the adrenal glands and requires veterinary diagnosis and medication. Horses that do not shed their coats may need to in order to keep them comfortable in warm weather.

Parasites can deplete a horse of necessary nutrients and affect the coat, and so implementing a regular and up-to-date worming routine is vital. Adding a daily dose of vegetable or linseed oil to the horse’s feed may help to promote a shinier coat and speed up the shedding process.

You may notice that your horse rolls more or rubs against trees or fences to help work the old hair loose. A sweating horse becomes very itchy and uncomfortable and so grooming is very important, but excessive dandruff or greasy skin, can indicate other problems so check the skin and hair for signs of lice or skin disease.

Improving your horses core strength from the ground

Facebooktwitterredditpinterestlinkedinmail

Horse Scout blogger in meditation mode: Whether you are training a top class show jumper or Eventer as an athlete or working with young horses or perhaps trying to balance a big horse under you as per my recent blog. Then working from the ground is a useful and effective way to begin working on core strength with your horse.

Core strengthening exercises strengthen and stabilise the spine and pelvic muscles as the horse responds to pressure over specific areas. If you have strong hands, you can apply pressure manually; if not, use a metal thimble over your thumb or finger. Perform three to five repetitions, allowing the muscles to relax for a few seconds after each exercise.

Some horses, especially those that are girthy or cold-backed, may resent certain procedures. If resentment persists, omit the exercise until you’ve consulted with your veterinarian.

The following exercise stimulates lifting of the base of the neck, sternum, and withers through pressure on the ventral midline between the forelimbs. These movements are essential for self carriage.

Sternal, withers, and thoracic lifting exercise:

1. Stand facing the horse’s side, just behind the elbow.

2. Apply upward pressure to the sternum (breastbone) in the middle of your horse’s chest, between the pectoral muscles. Gradually slide your hand back between the forelimbs and behind the girth line while maintaining a steady upward pressure.

3. The horse responds by initially lifting through the sternum and withers. Then as the pressure moves further back, he responds by lifting in the thoracic area immediately behind the withers, and finally in the thoracic area under the saddle.

Note: the amount of pressure needed to stimulate a response will vary between horses, so start gently and increase pressure gradually, or use a slow stroking action until the horse responds.

  1. Balancing Exercises

Balancing exercises improve balance and stability by inducing the horse to use active muscular contractions to shift the centre of gravity toward his haunches and/or to resist displacement of his centre of gravity. A horse uses his muscles in some of the balancing exercises to shift his centre of gravity, while in others, he uses his muscles to resist a shift.

The next exercise stimulates activation of the pelvic stabiliser muscles to maintain the horse’s balance.

Tail pull:

1. Stand to one side of the hindquarters.

2. Take hold of the horse’s tail, pull it toward you by flexing your elbow. (The goal is not to pull the horse off balance, but to stimulate resistance in the pelvic stabiliser muscles.) You’ll see the muscles around the stifle contracting as the horse resists the pulling force.

3. You can gradually increase the amount of force applied to the tail or the number of repetitions as the muscles get stronger.

Remember to check with your veterinarian before including such exercises into your horse’s training regimen; this is especially important if the horse is recovering from an injury.

Core training exercises can be done without a warm-up–for example, in horses that are recovering from injury–because the horse controls the amount of motion, and loading of the joints is less than during locomotion.

This advice has come from Dr. Hilary Clayton —equestrian, veterinarian, author, researcher, and clinician — is known internationally for her ongoing contribution to the understanding of equine biomechanics particularly relating to performance and conditioning.   Dr. Clayton’s targeted studies in bitting, saddle fit biometrics, kinematics and kinetics, and locomotion have provided valuable insight into the mechanics of equine sports, the interaction between rider and horse, and the effects of various rehabilitation techniques.  You can read about her here of buy her book The Dynamic Horse.

Spook McGill? 19 Top Tips for de-sensitising your horse – not numbing it!

Facebooktwitterredditpinterestlinkedinmail

One of the first things that happens when a horse spooks – is the rider spooks too!

So, take a break; don’t think Kit Kat think Cadbury’s Caramels’ Rabbit and “Take it easy”

  1. First you: The following tips show how you can calm yourself down,  and in turn help to calm your horse:
  2. Breathe! When we are anxious our breathing becomes rapid or stops. Take deep breaths to relax yourself.
  3. Relax your shoulders. Drop your shoulders down and let your arms relax a little too.
  4. Relax your legs. The tenser you are the more your legs will dig in. A sensitive horse may confuse this as an aid.
  5. Talk in a soothing voice. “Shhh” your horse and talk calmly to it in a low husky “whickering” voice.  You can practice this at home, soothing your horse when grooming and just making it a relaxing time for him/her. This will also relax  you.
  6. Laugh and Yawn. Even if you are on the verge of tears, yawn and giggle even sing! If you are doing this at home when your horse is relaxed, he will associate the sound with no danger.
  7. Know your horse  If you know what your horses limits are then you can work on them.
  8. Soothe Your Horse. Horses don’t like to be afraid, so work on their natural instincts to bring them back to harmony.
  9. Encourage your horse to lower its head by having low and open arms. A horse is relaxed when its head and ears are down.
  10. Scratch your horses withers and neck as if you are mutually grooming.
  11. If you have a new horse always introduce them to a few “scary” things in the arena or yard before hitting the road.
  12. Introduce potentially spooky things when you horse is in a safe enclosed space.
  13. At first leave things far away but clearly seen then gradually move them nearer.
  14. Don’t always put them into the same place – or the horse might come to associate that particular area with spooks and then continually spook just there even when there is nothing to actually spook at!
  15. As he becomes accustomed move things into the arena and ask him to work around them.
  16. Working from the ground initially and give him something else to think about such as asymmetric poles laid on the ground, or jump stands to walk around and through; anything which will ask him to think about other things.
  17. Again introduce all new things slowly, take your time and praise then stop and return another time.
  18. Many people use the following in an arena to desensitize their horses: umbrellas, wheelbarrows, bikes, cars/lawnmowers, tarpaulins or plastic bags on the fence or even the ground.
  19. Do this safely though and think about yours and the horses safety.

Lets Look at Leg Yielding – 9 Top Tips to help you make use of this strengthening exercise.

Facebooktwitterredditpinterestlinkedinmail

The aim of leg yielding: To demonstrate the suppleness and lateral responsiveness of the Horse.

Leg-yielding is performed in Working trot in FEI Competitions.

What is looks like

The Horse is almost straight, except for a slight flexion at the poll away from the direction in which it moves, so that the rider is just able to see the eyebrow and nostril on the inside. The inside legs pass and cross in front of the outside legs.

Leg-yielding is preparatory work for more complex movements and is a good first step in strengthening the horses back muscles. It should be included in the training of the horse before it is ready for Collected work. Later on, together with the more advanced shoulder-in movement.

It is the best means of making a horse supple, loose and unconstrained for and a will prepare the horse to move with freedom, elasticity and regularity of its paces bringing lightness and ease in its movements.

Leg yielding can be performed “on the diagonal” in which case the Horse should be as nearly as possible parallel to the long sides of the arena, although the forehand should be slightly in advance of the hindquarters. It can also be performed “along the wall” in which case the Horse should be at an angle of about thirty five (35) degrees to the direction in which he is moving.

How to Execute the Leg Yield (tracking right)

  1. Start in Working Trot, sitting
  2. When approaching the long side, half halt
  3. Shift weight to left seat bone
  4. Apply the left leg behind the girth – actively pushing sideways each time the left hind lifts and starts a forward/sideways step
  5. Right rein guides the direction of travel and prevents bulging of the right shoulder
  6. Right leg continues forward movement and prevents rushing away from the left leg
  7. Apply left rein for slight flexion – this is the last aid and is applied lightly
  8. Straighten and ride forward
  9. Please note that the horse is ridden straight between the reins.

Many variations of this exercise can be used to assist in preparation for more advanced lateral movement. If you are unfamiliar with the leg yield aids, you can practice this exercise at the walk to familiarize yourself with the appropriate application and timing of your aids. This exercise can be executed along the rail or on the inside of the arena as well.

Purpose of the Leg Yield

This movement is the precursor to the shoulder-in and half pass seen in the more advanced tests. The horse should remain supple and relaxed during the execution of this movement.

To supple the horse

To assist with initial straightening for other more advanced movements

Each of the above reasons relates to confirmation of or improvement of the horse’s balance. Half halts can be used as needed so long as appropriate releases and praise are used.

It is also a good exercise in warm up executed with the horse in a long low outline particularly where a horse is broken in the neck and tends to over bend and, therefore, is avoiding coming through along his top line.

Common Errors in Execution

  • Horse does not remain straight
  • Horse leads with hind quarters
  • Rider applies too much inside rein & not enough supporting rein
  • Horse is too steep sideways due to not enough forward driving aids.


How can I stop my horse pulling? …. 3 steps to go!

Facebooktwitterredditpinterestlinkedinmail

Does your horse get offended when you pull on the reins to stop? Does he pin his ears, shake his head, and keep going? Have you ever asked “how can I stop my horse pulling?”

Maybe he’s trying to tell you something: stop pulling on the reins! 🙂

There is a way to get your horse to stop without pulling on the reins.

but first, you both have to be “in sync” together, working in tandem instead of against each other.

If you haven’t done this before, it may take a few tries to convince your horse that you want to work with him. Horses that are regularly pulled on seem to accept that the pressure has to be there before they should respond. They might learn to lean on the bit, pulling against you while you pull backward, hoping for the legs to stop.

Some horses are generous and eventually slow their feet, stop/starting until finally, all four legs come to a halt. Other horses might not be quite as forgiving and just keep going until you have to put more and more pressure on the mouth. Eventually, one of you wins but it’s never pretty!

We all dream of finding the halt that looks like we are in complete harmony with our horse. You know – the one that feels like the horse’s legs are your legs, and your mind is so coordinated with the horse that it looks like you are reading each other’s thoughts.

It does happen. The secret: ride from your seat.

Setup for a Correct Halt

1. Contact

Prepare several strides ahead of the intended location. Your reins should be a good length – not too long and not too short. There should be a steady enough contact on the bit to be able to communicate very subtle changes of pressure.

2. Begin a series of half-halts.

The half-halts start at the seat. In rhythm with the horse’s movement, resist with your lower back. Be sure to resist in rhythm. In other words, your lower back and seat will feel something like this: resist… flow… resist… flow… resist… flow.

2a. Use your legs.

During each flow moment, squeeze lightly with your calves. This helps the horse engage his hind end deeper underneath the body in preparation with the halt.

2b. Use the hands.

During each resist moment, squeeze the reins with your hands. You might squeeze both reins or just one rein (the outside rein being the usual rein) but in any case, do your best to use the hands after the leg aids. The rein pressure should occur in tandem with the resisting seat aid.

3.When you are ready for the halt, simply stop your seat.

Maintain contact with your legs and reins, but stop the activity. Don’t keep pulling on the reins.

If the horse is truly with you, his legs will stop lightly and in balance.

Horses that have been trained to respond to the half-halt will sigh in relief when you lighten up on your aids and use your seat in the halt. You might be surprised at how easily the legs will stop if you can improve your timing and releases.

Horses that have always been pulled on might not respond at all. They might be expecting to be hauled backward, thrown to the forehand, and dragged to a stop. If this is the case, be patient. If you haven’t done this before, it may take a few tries to convince your horse that you want to work with him.

You might have to bridge the learning gap by applying the half-halts several times, stopping your seat and then pulling to stop. In the end though, the pull should disappear completely from your vocabulary (exception: in an emergency stop).

Regardless of how you get there, the goal is to stop all four legs in a light, balanced manner that allows the horse to use his hind end when he takes that last step. Your horse might walk a few strides and then halt.

If you feel your horse’s front end lighten and into the halt, you know you are on the right track. If you discover the four legs stopped square and parallel to each other, pet and gush over him, and call it a day!

Sound talking : horse listening.

Perhaps you would benefit from some lessons, someone on the ground to help you keep on track.  Horse Scout has a great list of professional trainers, check them out here – they should be able to help you stop your horse from pulling.

Looking to learn? – 8 Tips to help point you in the right direction and find the right instructor for you

Facebooktwitterredditpinterestlinkedinmail

Lets help you find your perfect match in the arena. If you are thinking that you want to learn to ride or to improve your techniques then you need an instructor who will work well with you and you need to really think about the what, the how and the when?

  1. If you are a novice then opt for a venue which offers joint classes for different age groups, a range of riding instructors, and different school master horses.
  2. Trainers are usually the best option if you want to learn a specific style of riding, develop your competitive ability, or work with both you and your horse. Consider carefully what you want to learn – classical riding, show jumping, natural horsemanship riding, dressage or even cross country riding.
  3. Do you want regular lessons, or an intensive course?
  4. Are you willing to travel with your horse weekly or less often?
  5. Find a lecture or demonstration at a local event to see exactly what is possible – many large riding schools and Equestrian Centres have these throughout the year so you can see what is achievable and whether the method is really what you want to learn.
  6. Research online what other riders have found helped.
  7. If your horse lacks confidence or has behavioural problems, attending a course that shows you how to use natural horsemanship may give you the skills to teach your horse yourself.
  8. Does your horse have problems with certain dressage movements – try a lesson on a school master first to get the feel of how a movement feels.

Just remember that one size doesn’t fit all. Horse Scout has some top professional trainers who are expert in their fields.  Click here to find a perfect match for you and your horse.

10 top tips to help you remember that your horse is reactive – Not Toxic!

Facebooktwitterredditpinterestlinkedinmail

When its all going wrong: Have you ever wondered why your horse always does what you ask him?

Did you realise that is was you that asked him to stay standing on you toe?

Did you realise that you asked him to skip to the right as you approached the fence?

When something like this happens with a horse, try going back and reviewing what you actually told him. You’ll usually find the answer there.

The problem is that we often don’t have the knowledge or the skills to ask for what we want. We ask for something which the horse interprets as Behaviour A. We thought we were asking for Behaviour B. We keep on asking for B which the horse interprets as a request for Behaviour A. It keeps escalating. The horse is “bad.” Actually, the horse is trying to comply, but rather than his not listening to us, we’re not listening to him.

“My horse won’t do what I want—here comes the fatal saying—so …HE IS BEING BAD.”

As soon as I add that cop out conclusion that the reason my horse won’t do what I want is “because he is being bad,” I give myself “permission” to punish him for that “bad” behavior, and the downward spiral into a fight has begun.

“BAD” is a value laden word, which implies malign motive on the part of the horse. Even though we know that a horse is reactive we still insist that he is proactively challenging us. A good trainer almost never says or thinks, “My horse is being bad.” She may well say, “My horse won’t do what I want.” That’s a frequent fact. But then the GOOD trainer will start hunting for the REAL reason.

She might say, “My horse won’t do what I want BECAUSE…” one or several of these:

  1. He doesn’t understand the aids I just applied.
  2. He’s not calm enough yet in his work to handle this request.
  3. My warm up was too short—he’s still “high”.
  4. I`m asking him the wrong way, as in, I don’t know how to ask this question.
  5. The horse isn’t physically strong enough yet to comply with what I asked.
  6. Something hurts him, saddle fit, bit, hocks, stifles, back, something is making him uncomfortable.
  7. The atmosphere here is too electric for him to handle.
  8. Oops, I am in a bad mood, and I asked too roughly.
  9. I as a rider am not yet physically elastic and quiet enough in my riding to not upset him.
  10. …….or one of the other 101 other real reasons.


Don’t be demoralized, we all need help from the ground, talk to your trainer or find someone who can help you change your approach.

Keep those Show Jumps Standing- 7 steps to jump a perfect round.

Facebooktwitterredditpinterestlinkedinmail

To jump a horse successfully a rider can break each stage in the process down into seven separate steps. the seven stages need to be ridden accurately. With the rider remaining in balance and able to help the horse both before during and after the jump.

The 7 stages to jumping:

1. Turn.

2. Approach.

3. Take off.

4. Jump.

5. Landing.

6. Get away.

7. Turn.

1) The Turn

The turn to the jump needs to be ridden accurately so that it lines you up with the centre of the jump being straight ahead. The rider needs to be sitting up and looking ahead to the jump that they are going to do, with the horse being ridden from the riders leg up into the hand, to keep the horse in a balanced rhythm which has plenty of impulsion.

2) Approach

The approach needs to lead you directly to the centre of the jump which you are planning to jump. The rider needs to be sitting up, looking ahead and channeling the horse forward, between their hand and their legs enabling the rider to maintain a straight line, with the horse maintaining the impulsion and balance that is required.

3) Take Off

This is the point at which the horse begins to gather his hindlegs underneath his body and starts to lift up the forehand. The rider needs to keep their lower leg securely wrapped around, to maintain the horses energy and forward momentum.The riders hands need to follow the movement of the horses head and neck and still maintain a contact through the rein to the bit. At the point of takeoff the rider should still be looking ahead, up and over the jump.

4) Jump

This is the point at which the horse will bascule in the air,the forehand is well lifted, and the back well rounded, with their forelegs tucked up in the front and the hind legs tucked up at the back allowing the horse to clear the jump. When the horse is in the air the the rider folds into the jumping position. To achieve a good fold the riders upper body is lowered, with the seat being slipped to the back of the saddle, the riders hand position allows the horse to stretch through their neck, back and body, giving the horse the freedom of movement they require, while still maintaining a light contact through the rein. The riders lower leg needs to stay securely wrapped around the horse to help maintain balance when in the fold or jumping position. The riders position needs to fold straight so that they can still look ahead through the horses ears and on to the next fence, any deviation of the riders position by going off to the side or twisting of the position will unbalance not only the horse but ultimately the rider as well.

5) Landing

The horse now starts to stretch out and extend their front legs ready for landing. Depending on the cater lead that is required, the horse will land with one foreleg landing first then quickly followed by the other foreleg, and the hindquarters following through from behind. The rider will start by bringing their upper body back up into a upright position, while still allowing their hands to remain in contact through the rein to the bit in the horses mouth, but without interfering with the horses balance and movement, this is especially important as horses use their necks for most of their balance. The riders lower leg should remain in position, still on the girth area of the horse, with the rider looking ahead to the next fence.

6) Get Away

The horse is now moving away from the jump and on to the next. The rider needs to make sure that the horse is in balance with plenty of energy and impulsion still being generated and that the horse is on the correct canter lead to enable it to turn in balance to the next fence. The rider should check that their position is still accurate, with reins the correct length, and lower leg secure and with the upper body sitting tall and the rider focused on the next jump.

7) Turn

This is where the rider turns away from one fence and on to the other, and the seven stages start all over again.

Are you looking for a jumping horse.  Horse Scout has some great horses and ponies advertised on its pages.  Take a look.